前情提要
此篇是以 ubuntu 20.04 作為範例,同時也可以使用在 mac、windows WSL 當中,稍微會有一點不同的設定可以參考 My_Terminal_Theme

安裝、設定方式
總共有以下步驟:
- 安裝 zsh
- 安裝 oh-my-zsh
- 安裝 zsh theme: powerlevel10k
- 安裝 zsh 好用 plugins
- 安裝 powerline font
- 修改 powerlevel10k 設定
- 修改 terminal 的 color scheme
- 固定指令列在終端機底部
首先,如果 ubuntu 系統是剛灌完,建議利用下面兩步驟先更新一下,如果是舊玩家直接跳過這一步驟進入 zsh 基本安裝即可。
1 | sudo apt-get update |
順便把一些套件裝一下。
1 | sudo apt install vim curl git |
安裝 zsh
1 | sudo apt install zsh |
如果裝好了可以用這個指令查看。
1 | cat /etc/shells |
更換 login shell,要記得 logout 才會生效。
1 | chsh -s $(which zsh) |
安裝 oh-my-zsh
1 | wget https://raw.githubusercontent.com/ohmyzsh/ohmyzsh/master/tools/install.sh |
安裝 zsh theme: powerlevel10k
Oh My Zsh 安裝 powerlevel10k。
1 | git clone --depth=1 https://github.com/romkatv/powerlevel10k.git ${ZSH_CUSTOM:-$HOME/.oh-my-zsh/custom}/themes/powerlevel10k |
安裝好後要修改 zsh 設定檔 .zshrc,先把主題換成剛剛安裝的 powerlevel10k
1 | ZSH_THEME="powerlevel10k/powerlevel10k" |
然後下這個指令。
1 | source ~/.zshrc |
可以去對 prompt 做基本的設定,包含 prompt style 等。
1 | p10k configure |
安裝字型
Powerlevel10k 推薦使用 Meslo Nerd Font。
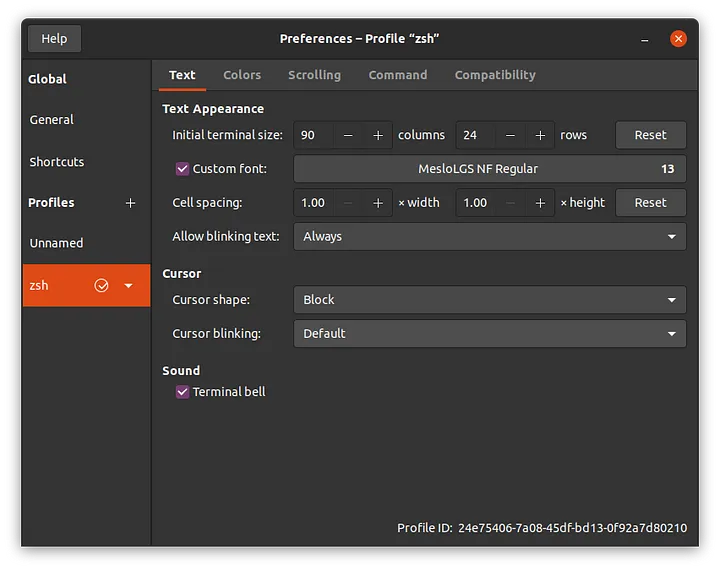
下載好後,修改 GNOME Terminal (the default Ubuntu terminal) 步驟如下。Open Terminal → Preferences and click on the selected profile under Profiles. Check Custom font under Text Appearance and select MesloLGS NF Regular.
如果是 xfce4 双击字体文件没有安装选项时,需安装font-manager
1 | sudo apt-get install thunar-font-manager |

安裝 zsh 好用 plugins
裝好後修改 .zshrc 把 plugins 加到設定檔。
1 | plugins=( |
立即生效。
1 | source ~/.zshrc |
修改 powerlevel10k 設定
設定檔 .p10k.zsh,修改完要下 source ~/.p10k.zsh。
這邊我只簡單介紹兩個我有修改的東西,其他也是差不多改法,可以參考 powerlevel10k 有很詳細的說明。
修改 prompt 資料夾路徑如果太長超過過一個長度,中間的資料夾名稱會變成縮寫如下圖,這邊我把它改成大於 20 個字,不過可以視自己螢幕大小修改。
typeset -g POWERLEVEL9K_DIR_MAX_LENGTH=20
修改 prompt 當前目錄的顏色,這邊可以參考 directory-is-difficult-to-see-in-prompt-when-using-rainbow-style 有很詳細的說明,底下是我自己更改的版本還要配合修改 terminal 的 color scheme,也可以依照自己喜好修改。
1 | # Current directory background color. |
修改 terminal 的 color scheme
這邊提供我自己改的顏色,有參考 Windows Terminal Themes 當中的 Brogrammer,還有 Mac 的 terminal 進行修改。
1 | { |
固定指令列在終端機底部
可以在 .zshrc 當中加入這行,把命令列固定在最底下,視線就不用一直改動,我自己是很喜歡這個功能,不過這個有時候會有一些時候還是會跑掉,e.g. 下 clear 指令的時候,期待有人能找到更好的方法XD
1 | # Fix prompt at the bottom of the terminal window |
最後
如果有看到哪個地方可以修改的或是有不錯的套件歡迎告訴我,一起打造一個高效率的開發環境。
歡迎參考 My_Terminal_Theme 當中的配置,也可以找到 Mac、WSL 的版本,都是可行的。